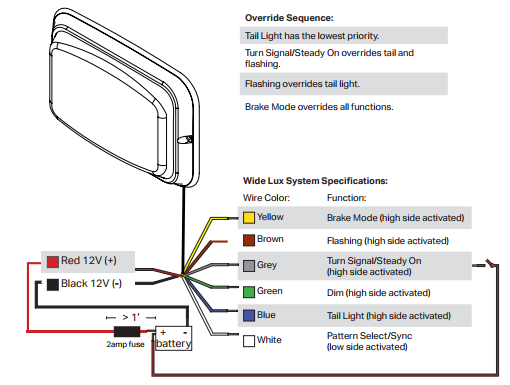
Step 1: In order to activate the unit, extend the red, 12V+ wire to the 12V+ post of the vehicle’s battery. Extend the black, 12Vwire to the ground post of the vehicle’s battery.
Step 2: To turn the unit on, connect the Brown wire to a 12V+ power source or switch.
Step 3: Momentarily connect the white wire to a 12V- source to change flash patterns.
Step 4: With the brown wire still connected to 12V+, connect the green wire to the brown wire. This should engage the dimming function on, turning all LEDs on to 5% of the original brightness.
Step 5: To engage turn signal/steady on, connect the grey wire to 12V+. This function should engage all LEDs steady on at 50% of brightness.
Step 6: To engage tail light/steady on, connect the blue wire to the 12V+. All LEDs will turn steady on at 5% of the original brightness.
Step 7: To engage Brake Mode/Steady on, connect the yellow wire to 12V+. This function will turn all LEDs steady on at 50% brightness. Note on this function the unit will flash twice and then engage into steady on mode.
Optional Step: To Alternate Light Heads For the light head to alternate, one light head must be set as master and the other as slave on the mode wire intended for use. To do so, hold the white (flash pattern changer) wire to ground for 3 seconds. If all LEDs turn on this indicates master mode. If half the LEDs activate this indicates slave mode. Set one unit as master and the other
as slave.
For all other Wide Lux inquiries please see the appropriate articles or go to our website and research the literature for this product.