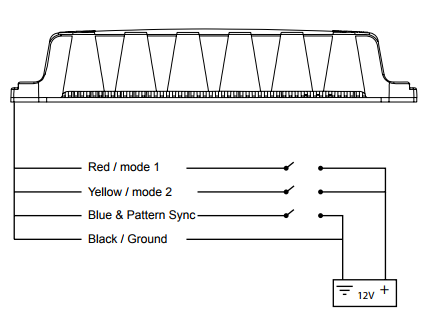
Step 1. To activate the unit, extend the red (+) or yellow (+) wire to a 12V post. Extend the
black (-) wire to the ground post of the vehicle's battery. Please note that mode 2
overrides mode 1.
Step 2. Momentarily connect the blue wire to the Ground (12V-) to cycle through the
flash patterns.
Step 3. Synchronization: To Sync two or more light heads together:
A. Apply 12V+ power to the red or yellow (+) wire and apply 12V- to black wire to
power the unit on.
B. Cycle through all patterns by tapping the blue (flash pattern changer) wire to the
activated black ground wire until the steady burn pattern is selected.
C. Connect one of the same colored mode wires (red or yellow) of the two light
heads together; connect the black wires of the light heads together and then
connect the blue wires of the light heads together.
To Alternate Light Heads:
D. Follow steps A-B.
E. For the light heads to alternate, one light head must be set as master and the
other as slave on the mode wire intended for use. To do so, hold the blue (flash
pattern changer) wire to ground for 3 seconds. If all LEDS turn on this indicates master mode. If no LEDS turn on this indicates
slave mode.
F. Follow step C. Change patterns by tapping the blue wire to the activated black
ground wire.
Step 4: If the wiring is correct and your controller is functioning properly yet the Fusion Surface Mount is still not functioning properly, please contact Feniex Technical Support for assistance (1-800-615-8350)
For all other Fusion Surface Mount inquiries please see the appropriate articles or go to our website and research the literature for this product.